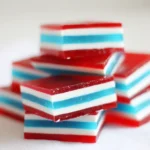
Today we’re making layered jello-a colorful, wiggly, no-bake dessert that’s just as fun to make as it is to eat. With bold fruity flavors, creamy white layers, and eye-catching stripes, this classic treat always steals the show. Whether you’re prepping for the 4th of July, a birthday bash, or just craving something nostalgic, layered jello brings the party to every plate. I grew up watching my grandma stack the layers one by one, and now it’s one of my go-to recipes whenever I want something easy, festive, and totally crowd-pleasing. Let’s do it!
Ingredients for Layered Jello
Contents
- 1 Ingredients for Layered Jello
- 2 How to Make Layered Jello (Step-by-Step)
- 3 Jello Jigglers Tip!
- 4 Layer Variations & Sweet Combos
- 5 Let’s Talk Texture
- 6 Get Creative with Your Colors
- 7 Layered Jello Tips & Tricks
- 8 Holiday Color Combos
- 9 FAQs About Layered Jello
- 10 Layered Jello Recipe
- 11 FAQs About Layered Jello
- 12 Final Notes: Sweet Success with Layered Jello
Here’s everything you’ll need to pull off those perfect, Instagram-worthy layers:
| Layer | Ingredients |
|---|---|
| Colored Layers | 3 (3 oz) boxes of flavored Jell-O (cherry, blue raspberry, etc.) |
| White Layer | 2 packets unflavored gelatin, 1 can sweetened condensed milk |
| Water | Boiling and cold water as needed |
| Cooking Spray | Non-stick spray to grease the dish |
Hot tip: Mixing in unflavored gelatin with the flavored Jello helps firm things up. That means cleaner cuts and layers that stay in place—key for those sharp striped jello squares.
How to Make Layered Jello (Step-by-Step)
We’re making this together, and I promise—it’s way easier than it looks. You’re basically making Jello… six times.
So grab your favorite flavors, a comfy apron, and let’s make this layered jello dessert!
1. Prep Your Dish
First off, grease a 9×13” glass baking dish with non-stick spray. This keeps the layers from sticking and makes it easier to lift out perfect squares later.
🍴 Glass dishes work best because you can see your beautiful layers form as you go!
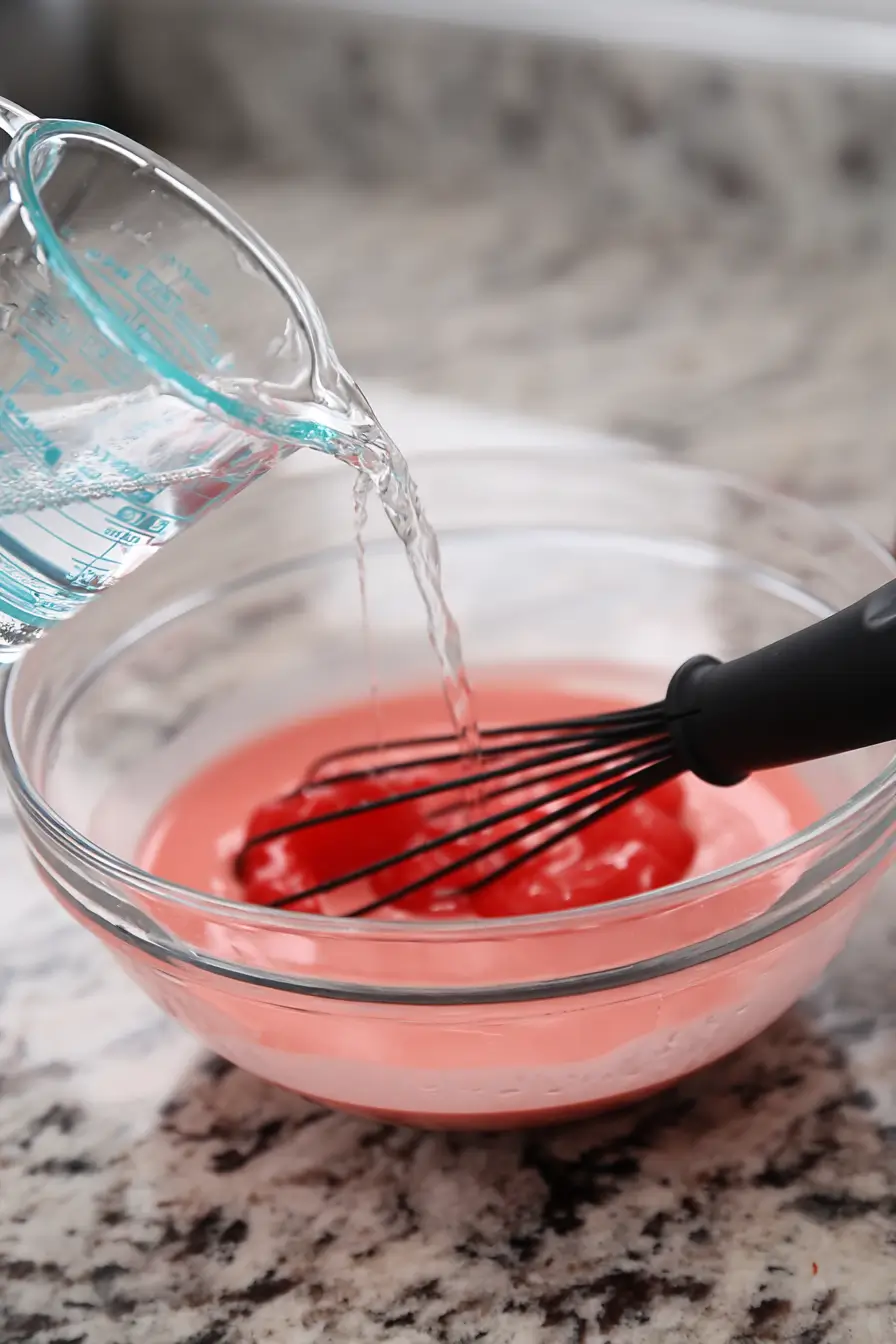
2. Make Your First Colored Layer
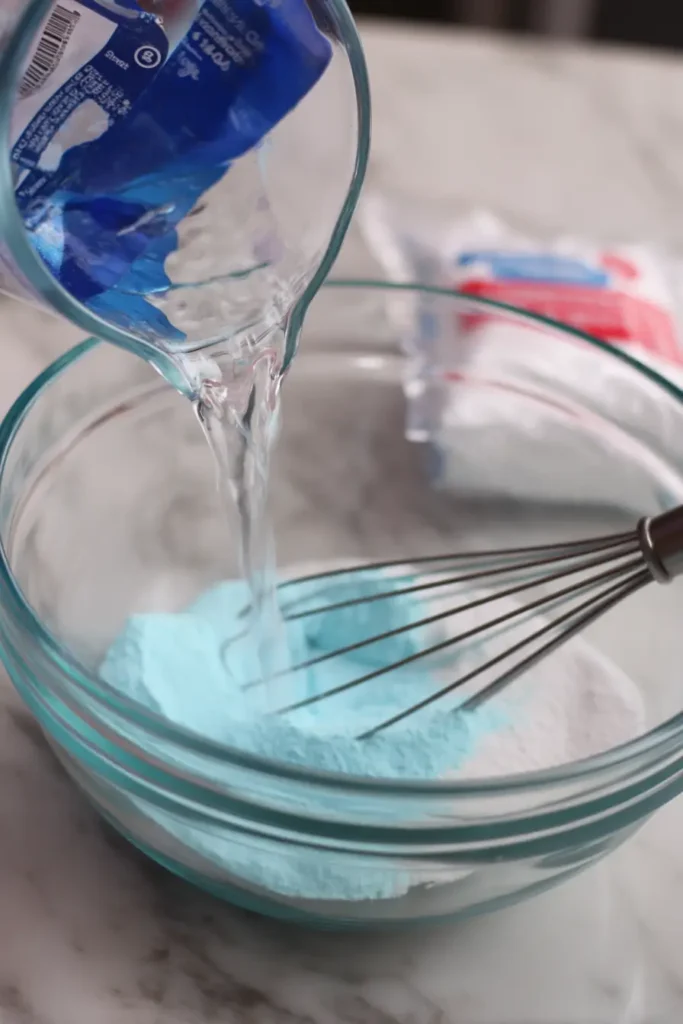
- In a bowl, combine 1 box of flavored Jell-O (like cherry or blue raspberry) with 1 packet of unflavored gelatin.
- Pour in 1 cup of boiling water, and stir until fully dissolved.
- Let it cool at room temp for about 5 minutes—don’t skip this or it might melt your other layers.
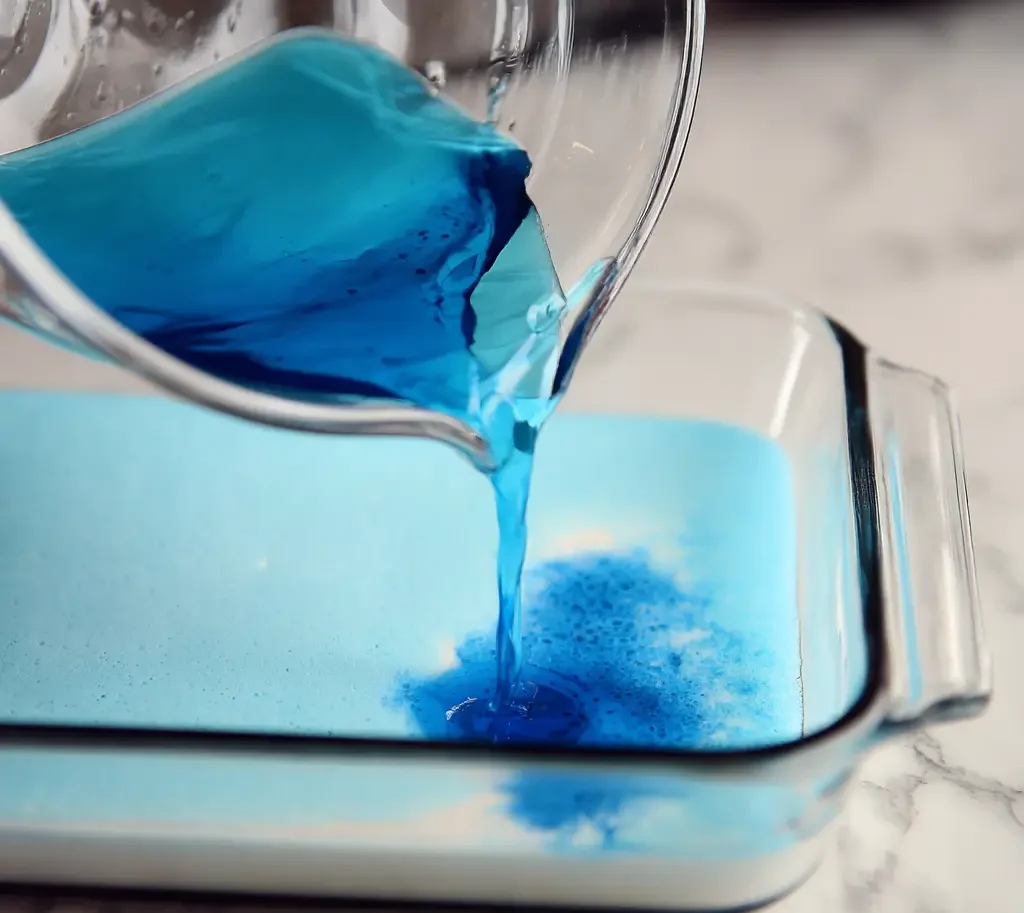
- Carefully pour into the pan.
- Chill for 20–30 minutes, or until set.
🎯 You’re going to repeat this process with different colors, alternating with white.
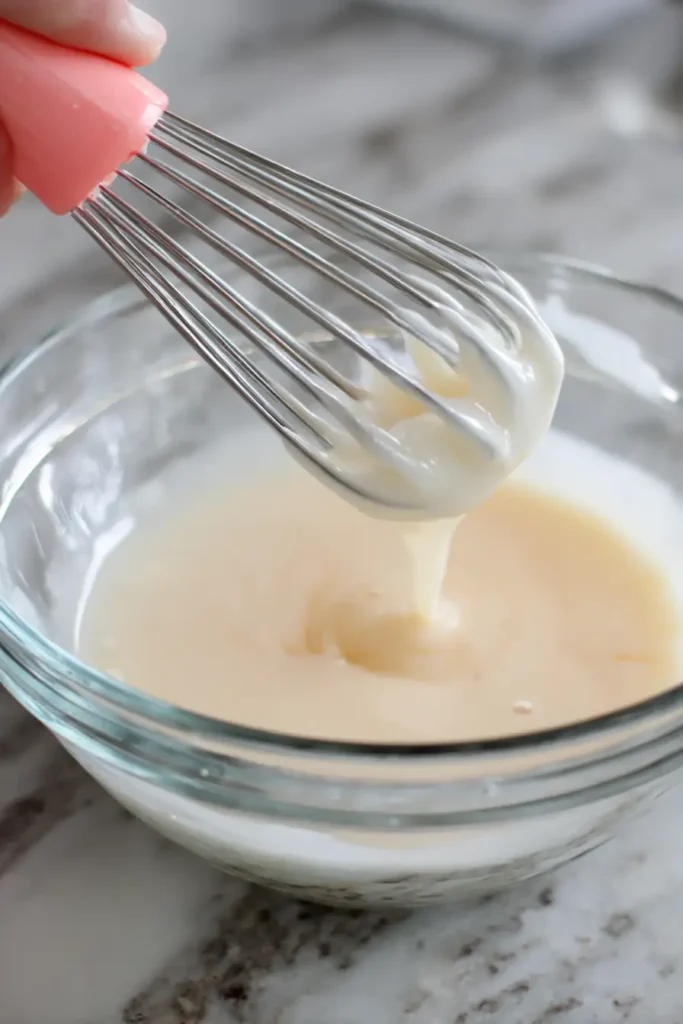
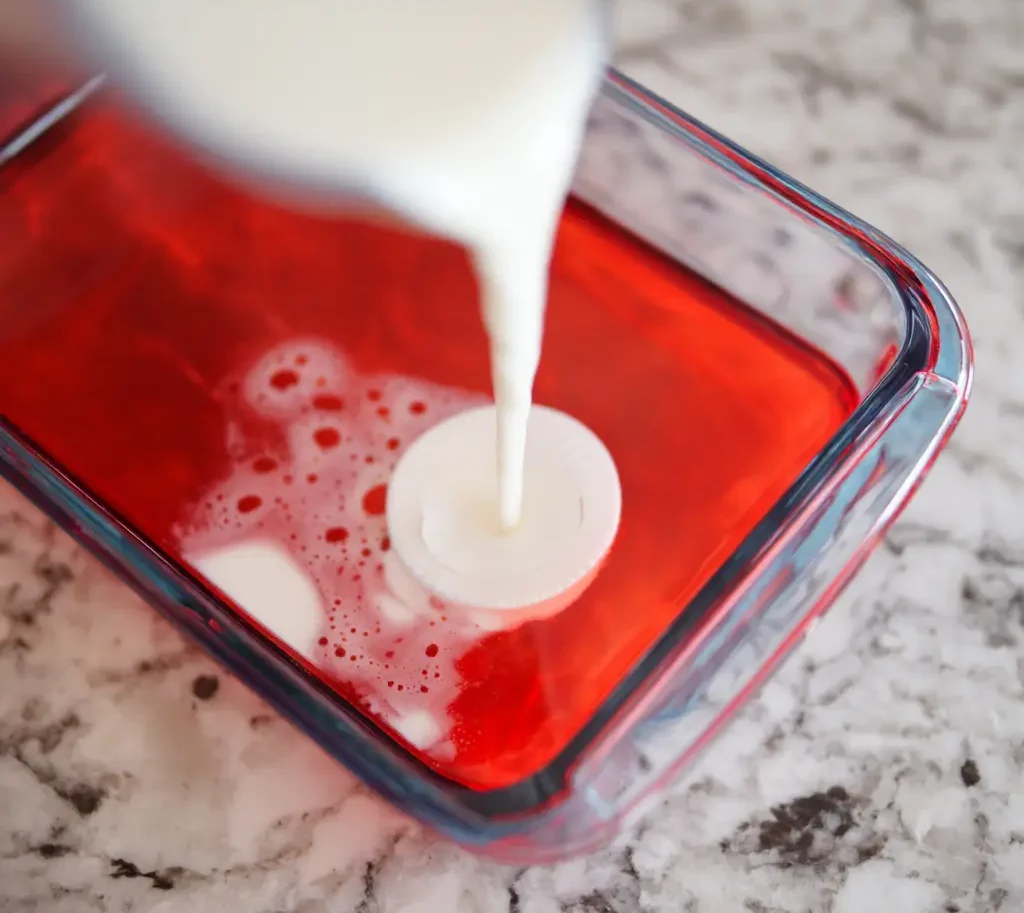
3. Make the White Layer (The Creamy Middle)
This layer is what gives that dreamy contrast—and yes, it tastes as good as it looks.
- In a separate bowl, sprinkle 2 packets of unflavored gelatin over ½ cup cold water. Let it bloom for 5 minutes.
- Add 1½ cups boiling water and stir until gelatin dissolves.
- Stir in 1 can of sweetened condensed milk until smooth.
- Let it cool to room temperature before pouring (warm milk layer + set colored layer = disaster).
4. Layer Alternately
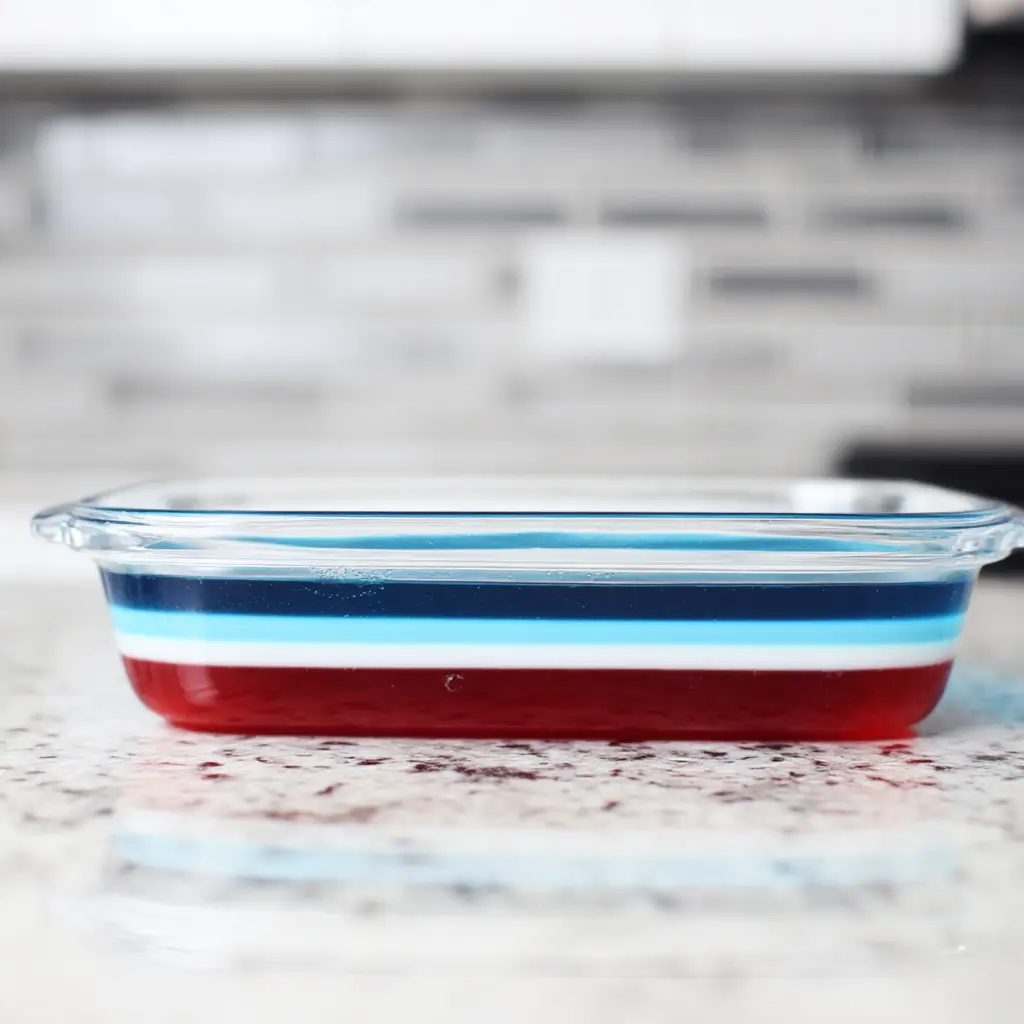
Once your first layer is firm, gently pour on a layer of white. Chill again for 20–30 minutes. Repeat the layering process, alternating colors and white until your pan is full—or your heart is.
You’ll get 6–8 layers with this batch, but if you’re going for a full-on rainbow jello effect, go big and make 10–12 layers! And if that rainbow vibe has you inspired, you have to check out these Rainbow Cupcakes—they’re the baked cousin of this jiggly treat.
5. Chill Until Firm
Once your final layer is in, pop the whole dish in the fridge for at least 2–4 hours, or overnight if you’re prepping ahead (which I totally recommend).
When it’s time to serve, use a sharp knife (dip in warm water first!) and a small spatula to pop out those gorgeous party jello cubes.
It’s like edible stained glass—eye candy and real candy in one bite.
Jello Jigglers Tip!
Want to make these as jello jigglers for kids? Use a deeper mold and slice into fingers instead of cubes. Perfect for sticky hands and sticky memories.
Layer Variations & Sweet Combos
Don’t feel boxed in by red-white-blue. Here’s a cheat sheet for mixing it up year-round:
- Christmas: Red + Green Jello with a white layer
- Valentine’s Day: Pink (strawberry), White, Red (raspberry)
- St. Patrick’s Day Jello: Lime and white layers for a lucky treat
- Halloween: Orange + Purple + a sneaky black layer (grape with food gel!)
- Baby Showers: Soft pastels—think peach, mint, or lavender
Pair this with a light and airy Easy Trifle Recipe for the ultimate dessert table spread.
Let’s Talk Texture
This isn’t your grandma’s slippery snack. The extra gelatin added to both the flavored and white layers gives this a firm, sliceable bite—like finger jello meets cheesecake. If you’ve ever tried Cream Cheese and White Chocolate Cups, you know that creamy-sweet finish I’m talking about.
Get Creative with Your Colors
One of the best parts of making colorful jello layers is how flexible it is. Feeling funky? Do a neon gradient. Hosting a brunch? Match your layered jello to the napkins. Want to match your dessert to your Rainbow Cookies? Go full pastel and make it pop!
Layered Jello Tips & Tricks
Making layered jello is part science, part art—and these tricks will help you get it just right.
Microwave Your Milk Layer if It Gets Too Thick
Sweetened condensed milk sets fast, especially in a chilly kitchen. If your white layer starts to thicken before it’s time to pour, just zap it in the microwave for 5–10 seconds. Stir gently, and it should smooth right back out.
💡 This also works with the colored layers—just never pour them on while still hot or you’ll melt the layer underneath.
Pour Layers While the Dish Is in the Fridge
This one’s a game-changer: keep your dish right in the fridge while pouring. That means no sloshing layers, no jello tsunamis, and nice clean stripes.
If you’re making a big batch for a holiday potluck or pairing it with Mini Cake Ideas for a dessert table, this trick makes your prep so much smoother.
Use a Paring Knife and Small Spatula
When it’s slicing time, run a paring knife around the edge first, then cut straight down into clean squares or even cute shapes (think stars, hearts, or baby rattles for showers). A small offset spatula helps lift them out without wrecking your masterpiece.
Warm Water Bath = Lifesaver
Got a layer that cooled too much and firmed up before pouring? Just place the bowl over a warm water bath (not boiling!) and stir gently. This softens it enough to pour without compromising the texture.
This trick is especially handy if you’re juggling multiple batches of striped jello squares or making a rainbow jello version.
Holiday Color Combos
One of the best things about layered jello dessert is how you can customize it for literally any event. Go festive, go pastel, go neon—whatever matches your vibe!
Here are some of my favorite combos:
4th of July
- Red (cherry)
- White (milk layer)
- Blue (blue raspberry)
It’s the ultimate Fourth of July jello, especially when topped with whipped cream and patriotic sprinkles. Add Deviled Strawberries on the side for a red-and-white dessert duo!
Christmas
- Red (strawberry or cherry)
- Green (lime)
- Optional white layer in between
This version feels like a sweet holiday gift in every bite. Add some crushed candy cane on top for extra sparkle.
Valentine’s Day
- Pink (strawberry or watermelon)
- White (sweetened condensed milk gelatin)
- Red (cherry or raspberry)
Pair this with a few chocolate-dipped strawberries or a heart-shaped Key Lime Pie for a dreamy dessert spread.
Halloween
- Orange (orange)
- Purple (grape)
- Black (add black food gel to grape)
This holiday jello recipe is spooky, sweet, and seriously cool when cut into bats or pumpkins using cookie cutters.
Baby Showers
- Pastels like peach, mint, lavender
- Alternate with white for that soft, pretty contrast
Layer up based on gender reveal colors, or keep it neutral and sweet. Serve alongside mini Tater Tot Casserole bites for a fun and quirky baby shower combo—sweet, savory, and totally unexpected!
FAQs About Layered Jello
PrintLayered Jello Recipe

This layered jello recipe is a vibrant, no-bake dessert made with red, white, and blue gelatin layers—perfect for the 4th of July, patriotic parties, or any festive gathering. With sweet fruity flavors and a creamy middle, every slice is a jiggly showstopper!
- Prep Time: 30 minutes
- Cook Time: 0 minutes
- Total Time: 30 minutes
- Yield: 24 squares 1x
- Category: Dessert
- Method: Chilling
- Cuisine: American
- Diet: Vegetarian
Ingredients
Colored Layers
1 (3 oz) box red Jell-O (cherry or strawberry)
1 (3 oz) box blue Jell-O (blue raspberry)
2 packets unflavored gelatin (1 per colored layer)
2 cups boiling water (1 cup per layer)
White Layer
2 packets unflavored gelatin
½ cup cold water
1½ cups boiling water
1 can (14 oz) sweetened condensed milk
Other
Cooking spray (for greasing the dish)
Instructions
Prep Your Pan
Lightly spray a 9×13-inch glass baking dish with nonstick cooking spray.Make Red Layer
In a bowl, mix 1 red Jell-O packet + 1 packet unflavored gelatin. Add 1 cup boiling water and stir until dissolved. Cool for 5 mins, then pour into pan. Chill 30 minutes.Make White Layer
Sprinkle 2 packets of unflavored gelatin over ½ cup cold water. Let bloom for 5 mins. Add 1½ cups boiling water and 1 can sweetened condensed milk. Stir and cool to room temp.Pour White Layer
Once red is set, gently pour in half the white layer. Chill for 30 minutes.Make Blue Layer
Repeat step 2 with blue Jell-O and unflavored gelatin. Let cool slightly before pouring.Repeat Layers
Continue layering remaining white and colored gelatin, letting each set before adding the next.Final Chill
Chill the entire dish for at least 4 hours or overnight before slicing.
Notes
Always let each layer cool to room temp before pouring to avoid melting the layer below.
For sharp stripes, pour with the dish already in the fridge and use a spoon to slow the stream.
You can substitute flavors or colors for other holidays like Christmas, Valentine’s Day, or baby showers.
Nutrition
- Serving Size: 1 square
- Calories: 110
- Sugar: 17g
- Sodium: 45mg
- Fat: 2g
- Saturated Fat: 1.5g
- Unsaturated Fat: 0.5g
- Trans Fat: 0g
- Carbohydrates: 20g
- Fiber: 0g
- Protein: 2g
- Cholesterol: 5mg
Keywords: layered jello, 4th of July dessert, red white and blue jello, jello layers, no-bake gelatin
FAQs About Layered Jello
How long does jello have to sit before adding another layer?
– Gently touch the surface—if it doesn’t stick to your finger, you’re good to go!
Can I layer jello?
– Want to explore a twist on this idea? These Rainbow Cookies play with layers too—just in cookie form!
Why is jello no longer popular?
It’s true, Jello saw a dip in popularity for a while, mostly because fancier desserts took over the spotlight. But thanks to its nostalgic charm, kid-friendly appeal, and TikTok-worthy layers, layered jello dessert is making a big-time comeback. Especially for events like the 4th of July, baby showers, and birthday parties, people are loving the retro-vibes-meets-modern-cute factor.
Plus, let’s be honest—when else can you eat something that jiggles?
What happens if you use milk instead of water to make Jello?
Milk and fruit-flavored gelatin don’t always mix well—it can cause curdling or affect the set. BUT, using milk in the white layer (especially sweetened condensed milk with unflavored gelatin) is a whole different story. That’s how we get that creamy contrast in classic layered jello.
So skip the milk in your red or blue layers, but bring it on for the creamy white middle. It’s rich, smooth, and the secret to that dreamy melt-in-your-mouth bite.
Final Notes: Sweet Success with Layered Jello
There you go, kitchen superstar! Whether you’re making multi-layered gelatin for a big summer bash or just want a fun no-bake project with the kids, this layered jello recipe brings the magic. Those bright, colorful layers? They’re more than a dessert—they’re a celebration in every slice.
Make a double batch and freeze one for later—it holds up surprisingly well. Just wrap tightly and thaw in the fridge overnight. You’ll have party jello cubes ready for any occasion in a pinch!
👉 Want to show off your jiggly masterpiece or get inspired by more sweet ideas?
Follow us on Facebook and pin your favorites on Pinterest—we’d love to see what you’re cooking up!